Written and done by T.F. from Finland. Used since the 80´s during Finnish winter driving conditions in daily basis over 1 000 000 kms in my family and many others too. Multiple Raid Laponie test trips have been done in the past. Note: This is a hint for 2cv winter driving and the writer is not responsible if something goes wrong during this process. Do it at your own risk.
How to make 90 Celsius degree hot air blowers from the 2cv heat exchangers?
Prework:
Disconnect the battery! Clean all burning materials away from the engine room and surroundings and make sure that you have water, fire blanket and/or fire extinguisher next to you.
Step 1.
Find 3m of steel waterline pipe with dimensions D21,3 x 2,3mm.
Step 2.
Cut it into 20 x 150mm long pieces.
Step 3.
Find D25mm centering drill for cleaning the pipes from the inside diameter. Simultaneously it will sharpen the edges for smoother airflow.
Step 4.
Put grinding disc for the angle grinder and sharpen the outer edge of the pipes.
Step 5.
Find 0.8mm – 1mm cutting disk for the angle grinder. Cut the heat exchanger sides open as in the picture. Dremel with cutting disk might help also.
Step 6.
Sand rust off from the exhaust pipes inside the heat exchanger. It will help you during welding.
Step 7.
Release the heat adjustment cables from the heat exchangers.
Step 8.
Start welding the pipes against the exhaust pipe. Use high enough current in the welding machine but DO NOT BURN IT THROUGH THE EXHAUST PIPE! This is extremely important because exhaust gasses can be lethal. The first pipes have to be welded well against the exhaust pipe because vibration might cut them off if the weld is not done well. Also the heat from the exhaust will transfer better if the contact is good.
Step 9.
Before and after every pipe, test the heat adjustment flap that any pipe is not stopping its movement.
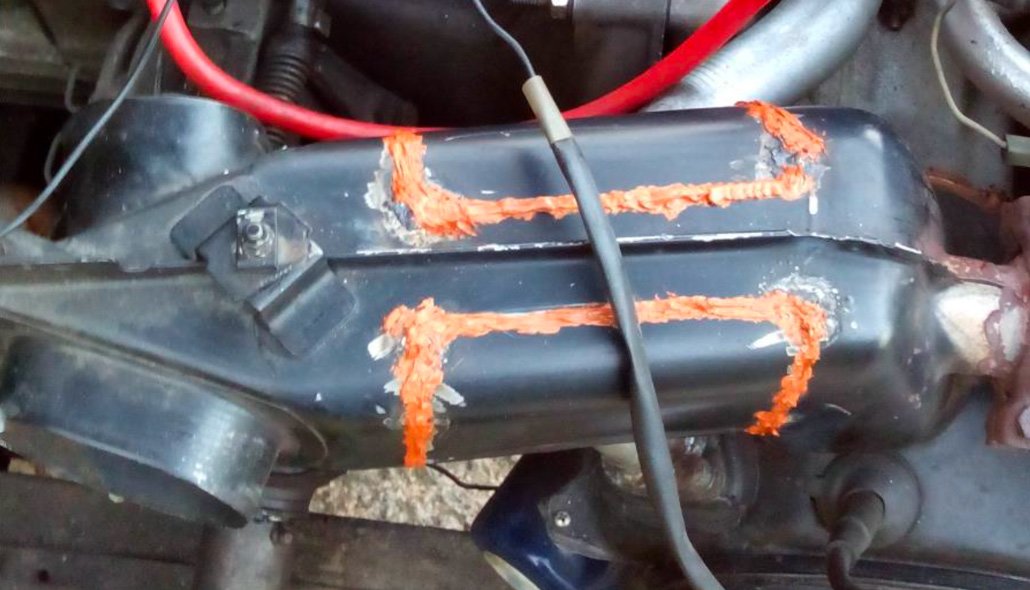
Step 10.
After welding 10 pipes for each exchangers start closing the sides of the exchangers. The best is if you have MIG/MAG-welding machine and you start making spots from down to up simultaneously when closing the sides. By doing this you will avoid dents on the sides. When opening these with 0.8mm-1mm cutting disk thickness it will help you at this stage because the welding groove is with good distance. As you see from the pics, I had only stick welder in outside conditions and therefore I used heat resistant silicone for the closing.
Step 11.
Insulate the exchangers with fireproof materials. I used as a first layer normal aluminium foil for reflecting the heat back to the exchanger. Then fireproof fabric as for example what you can cut from a fire blanket. Nylon rope can be used too. For top layer I used electric tape. Please note that be careful with the exhaust pipe parts! You can burn your 2cv if you don´t pay attention for this. Do not cover the exhaust pipes with any material which can burn.
Step 12.
Make sure that your oil temperature will be in good level even with cold conditions. Enjoy your warm and fast heating 2cv! Even some rattling noise might disappear from the engine room after this modification. Renew your heating pipes if those are not original like or in bad condition. Bind them together with the wiring loom that those won´t drop against the exhaust pipes and burn the 2cv.
Please note:
I did this modification at outside conditions with simple tools and had only stick welder. Therefore I can recommend this if you have the tools and some experience of welding work or a welder friend. There is not even need for taking the heat exchangers out from the car so therefore it can be used quickly after this modification. Please pay attention for the fire issues as mentioned in this instruction.
Copyright:
Can be done free of cost for private 2cvs only. I´m not the inventor of these but the purpose of these instructions is not to use it in any commercial ways. Please respect this, dear 2cv-friend. For publishing please contact the writer first.
For further questions you can find my contact information from Apua-Help-booklet.
Kuinka rättärin lämmönvaihtajat laitetaan puhaltamaan 90 asteen ilmaa?
Esityö:
Irtikytke akku, poista kaikki palomateriaali ympäriltäsi ja varmista, että käsilläsi on vettä, sammutuspeite ja/tai palosammutin. Tulityökortti on suositeltava varuste.
Vaihe 1.
Hanki 3m vesijohtoputkea mitoin D21,3 x 2,3mm.
Vaihe 2.
Leikkaa se 20 osaan, joiden pituudet ovat 150mm.
Vaihe 3.
Hanki D25mm senkkipora putkien sisäpuolisen purseen poistoon ja reunojen viistämiseen terävemmiksi.
Vaihe 4.
Viistä putkien ulkoreuna kulmahiomakoneen hiomalaikalla.
Vaihe 5.
Hanki 0.8mm-1mm leikkuuterä kulmahiomakoneeseen ja avaa lämmönvaihtajien kyljet kuvan mukaisesti. Dremel leikkuuterällä voi auttaa myös.
Vaihe 6.
Hio ruoste pois pakoputkista lämmönvaihtajan sisältä. Se helpottaa ensimmäisten putkien hitsaamista.
Vaihe 7.
Irrota lämmönsäätöläpän kaapelit.
Vaihe 8.
Hitsaa ensimmäiset putket pakoputkeen kiinni käyttäen riittävää virtaa hitsauskoneessa, mutta älä missään tapauksessa polta reikää pakoputkeen. Pakokaasun virtaaminen lämmönvaihtajasta kabiiniin on terveydelle haitallista. Liitosten pitää olla hyviä, ettei tärinä käytössä irrota putkia ja toisaalta se parantaa myös lämmönsiirtymään pakoputkesta tähän tulevaan putkikennoon.
Vaihe 9.
Ennen ja jälkeen jokaista putkea, testaa lämmönsäätöläpän liike, ettei mikään putki estä sen liikettä.
Vaihe 10.
Kymmenen putken hitsaamisen jälkeen per lämmönvaihtaja ala sulkemaan lämmönvaihtajien kylkiä. Parhaaseen tulokseen pääset MIG/MAG hitsauskoneella: Sulje kylkiä tekemällä pisteitä saumoihin alhaalta ylöspäin samalla kylkipeltejä sulkien. Tällä vähennät kylkien lommoontumista. Kuten kuvasta näkyy, minulla oli tuolla hetkellä vain puikkohitsauskone käytössä ja suljin saumat kuumankestävällä silikonilla muutaman puikolla räkäistyn pisteen avustamana.
Vaihe 11.
Eristä lämmönvaihtajat. Ensimmäiseksi kerrokseksi käy hyvin tavallinen alumiinifolio. Sen jälkeen tulenkestävä kangas, jota voi leikata esimerkiksi sammutuspeitteestä. Nylon-köysi käy myös. Viimeistelyyn sähköteippiä tai erkkaa. Sähköteippipinta on helpompi pitää puhtaana ja näyttää siistimmältä konehuoneessa. Älä missään nimessä rullaa pakoputkien yli materiaalia, mikä voi palaa, sillä se saattaa polttaa rättärisi.
Vaihe 12.
Huolehdi öljynlämpöjen riittävästä tasosta myös kylmissä olosuhteissa. Nauti lämpimästä ja nopeasti lämpiävästä rättäristäsi. Myös jotkin rämisevät äänet voivat hävitä konehuoneesta tämän muutoksen myötä, koska lämmönvaihtajat eivät toimi enää rumpukoteloina. Uusi lämmönvaihtajien ja korin väliset lämpöputket, elleivät ne ole hyvässä kunnossa, tai alkuperäisen kaltaista materiaalia. Sido nippusiteillä tai vastaavalla lämpöputket johtosarjaan ja/tai lämmönsäätövivun kaapeleihin, etteivät ne pääse putoamaan pakoputkien päälle.
Huomioitavaa:
Tein nämä lämmönvaihtajat yksinkertaisin työkaluin ulkoilmassa ja vain puikkohitsauskoneen avuin. Siispä voin suositella projektia, jos sinulla on pääsy näihin välineisiin ja jonkinlaista hitsaustaitoa tai hitsaustaitoinen kaveri. Lämmönvaihtimia ei tarvitse irrottaa kulkimesta tätä työtä varten, mutta huomioi varsinkin tulipalovaaraan liittyvät asiat, jotka on mainittu tässä ohjeessa. Kuten ohjeen alussa on mainittu; vain omalla riskillä, en ole vastuussa, mikäli jokin menee pieleen tätä muutosta tehdessä.
Tekijänoikeudet:
Ohjeen avulla tehtyyn muutokseen täysi oikeus maksutta, mutta ohjetta ei ole tarkoitettu kaupalliseen hyväksikäyttöön ml. tehostettujen lämmönvaihtimien myyntiin. Ohjeen julkaisua varten ole ensin yhteydessä kirjoittajaan.